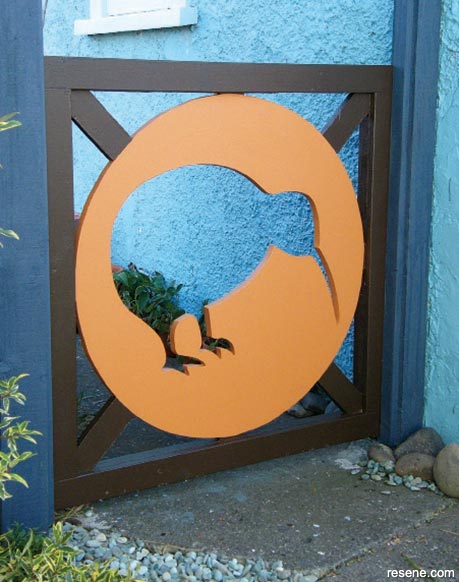
Mark Rayner makes a gate with a strong New Zealand twist.
You will need: Eight 930mm lengths of 70mm x 19mm treated timber (we used trimmed fence pickets), 1000mm x 1000mm panel of 22mm treated plywood, 40mm galvanised jolt head nails, two of 200mm stainless steel strap hinges with screws, drill with drill bits, saw, jigsaw, hammer, screwdriver, tape measure pencil, carbon paper, long steel ruler, string, exterior PVA glue, a thumb tack, paintbrush and sandpaper.
Resene Quick Dry waterborne primer undercoat, Resene Lumbersider tinted to Resene Burnt Umber and Resene Light Tan and a Kiwi template. To make a kiwi template, draw by hand or trace from a book, or download free clip art from the internet and enlarge by photocopying to approximately 600mm wide.
Note: Before assembling, cut timber and plywood to the dimensions listed below. After all cutting, smooth rough edges with sandpaper.
Top tip: In order to position the jigsaw blade within each section before cutting, drill a 10mm pilot hole.
![]()
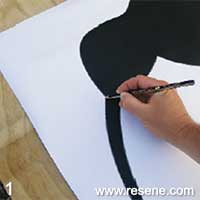
Step 1
Trace the outline of the kiwi template onto the centre of the plywood panel using a pencil and carbon paper.

Step 2
Rule a central vertical line, a central horizontal line and diagonal corner to corner lines to mark the centre point. Fix one end of the string to the pencil and the other to a thumb tack at the centre point so you can draw a 430mm radius circle.
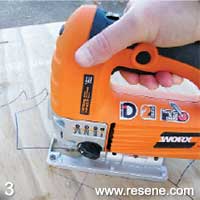
Step 3
Rule a ‘frame’ around all the panel, 70mm in from its edges. Mark lines 35mm out on each side of the vertical, horizontal and diagonal lines for 70mm inner ‘supports’. Cut out the inner kiwi outline and outer triangular sections with a jigsaw.
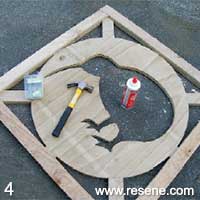
Step 4
Glue with PVA glue and nail (with galvanised nails) four lengths of treated timber around the panel’s front edges, as shown. Turn the panel over and attach the four remaining lengths around the back. Allow the glue to dry.

Step 5
Apply a coat of Resene Quick Dry waterborne primer undercoat to the entire gate and allow to dry for two hours.
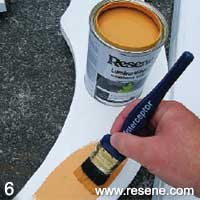
Step 6
Apply two coats of Resene Light Tan to the central circle, allowing two hours for each coat to dry.
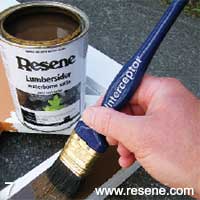
Step 7
Apply two coats of Resene Burnt Umber to the outer frame and inner supports, allowing two hours for each coat to dry.

Step 8
Fix the hinges to the gate, drilling pilot holes first, and then position and hang the gate, fixing hinges with remaining screws.
![]() Get inspired ! Subscribe
Get inspired ! Subscribe ![]() Get saving ! Apply for a DIY card
Get saving ! Apply for a DIY card
![]()
Can't find what you're looking for? Ask us!
Company profile | Terms | Privacy policy | Quality and environmental policy | Health and safety policy
Colours shown on this website are a representation only. Please refer to the actual paint or product sample. Resene colour charts, testpots and samples are available for ordering online. See measurements/conversions for more details on how electronic colour values are achieved.
What's new | Specifiers | Painters | DIYers | Artists | Kids | Sitemap | Home | TOP ⇧