 Airless tip guide
Getting the best out your spray equipment
When selecting the right filter set up for your spray system there are a few basic rules that are well worth following. If your tip size is…
.007 thou to .011 thou, use a 200 mesh filter (red).
.012 thou to .014 thou, use a 100 mesh filter (light blue).
.015 thou to .021 thou use a 60 mesh filter (black).
.023 thou or more for high build coatings, use a 30 mesh filter (grey).
Using the right filter and regularly cleaning it will reduce tip clogging. Filters must be free of all material after cleaning – if they aren't then it's time to replace them.
Selecting the best diameter hose to meet your length requirements is critical to getting a good spraying pressure. The greater the hose diameter the greater the pressure at the gun. If you decrease the diameter or reduce the hose length, the pressure at the gun will reduce.
When joining hoses together, connect the largest diameter hose to the sprayer, then the smaller hose to that.
For example, unit connected to 3/8 hose connected to 1/4 inch hose will give maximum pressure when spraying.
High build coatings require a larger diameter hose (3/8) to minimise the risk of tailing.
At all times use and follow the manufacturer's directions and wear the appropriate gear.
When using waterborne coatings, it is good practice to clean your unit daily.
For best results, follow these steps:
Flush your unit with water to remove paint from the unit and hose.
Drop the pressure and remove all filters. Clean them and store them safely in your tool box.
Put the unit back together without the filters. Clean excess paint off the pick-up shaft.
Remove the dirty water and replace with a bucket of fresh water, using hot water if possible. Mix in 2 capfuls of Resene Quick2Clean Paint Equipment. Flush through the unit until clean.
Mix a small amount of fresh water in a bucket with Resene Pump Protector. Run through your unit.
Drop the pressure and store your unit.
Choosing the right spray tip is essential for a quality finish no matter what material is being sprayed, but don't forget to check and replace your tips as all tips will wear with normal use. It's impossible to say how long a tip will last, because there is a huge difference in abrasiveness from one coating to another. Waterborne coatings are usually more abrasive than lacquers or enamels and paint is sprayed at different pressures so some tips will wear faster than others. Abrasive material sprayed at too high a pressure or through too small a tip causes faster tip wear, which wastes time and paint.
Just think... A contractor spraying with a worn tip uses, on average, 20% more paint and 20% more labour. In short, while you'll pay a bit more money in tips you'll pay a lot more if you don't.
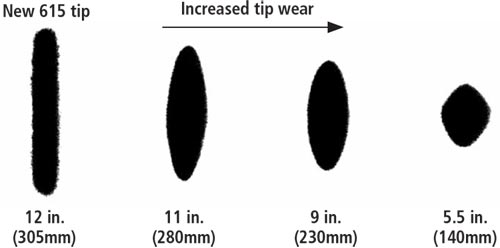
When a spray tip wears, the orifice gets bigger and rounder, which makes the fan pattern smaller. When the fan has lost 25% of its original size, it is time to replace the tip. When a tip with a 12 in. (305mm) fan wears down to a 9 in. (230mm) fan, it outputs 30% more paint on 25% less area. Continuing to spray with a worn tip makes the painting take longer, you use more paint and the finish may be uneven and have runs.
Spray at the lowest pressure that atomises the material.
Strain the material before you spray it.
Use the correct size filters.
Clean the filters after every use.
Clean the tip with a soft-bristled brush.
Work less (only an option if you don't have a mortgage to pay off!)
Always make sure you have the right tip in good nick otherwise your profits will be sprayed away in excess paint and labour.
We all know that applying paint by airless spray application can be a very speedy way of getting a lot of paint on the surface very quickly, however you must make sure everything is set up just right otherwise you'll end up using up more paint and time than you planned. One of the keys to successful spray application is making sure you have the right equipment to do the job including the right tip.
Of course there are what seems like fifty thousand different options in this area so to help you wade through all the info we've picked out the important bits for you. This handy guide applies to airless spray application only, because as we all know pressure pot and HVLP are a whole different kettle of fish...
If you have always wondered what all the numbers mean in the tip descriptions here's the easy way to decipher them... Take the first digit and multiply by 2 – that gives you the width of the fan. For example, a 515 would be a 10 inch fan (i.e. 5 x 2). The second and third digits tell you the size of the hole, therefore a 515 would be a 15 hole size.
If you want to cover a greater area with each pass do not try to do this by backing the gun away from the surface. The further away you are the less paint will reach the surface and the more you'll waste as overspray. Instead, use a tip with a larger fan and orifice. Remember if you use a tip with a larger fan but not a larger orifice, the build will be less and you'll have to move the gun slower.
Always make sure that the flow rate for the tip is lower than the maximum flow rate for the sprayer. If the tip flow rate is LESS than the sprayer flow rate you're all ok to go. If the tip flow rate is GREATER than the sprayer flow rate, you'll have to change either your tip or sprayer so that the sprayer flow rate is greater than the tip flow rate.
| Material | Tip size (in.) |
|---|---|
| Stain or lacquer | .011 to .013 |
| Solventborne paint | .013 to .015 |
| Waterborne paint | .015 to .019 |
| Heavy acrylic and smooth elastomeric | .021 to .025 |
| Elastomeric and block filler | .025 to 035+ |
These are good guidelines for exterior/interior work based on the average flow of a unit. You may wish to use higher or lower tip sizes; example: for doors you may choose to use a FFLP 414 tip and a FFLP 310 tip for the frames. Please don't hesitate to contact us for further advice to suit your specific project requirements.
Although most units are rated at 10 amps it is recommended that you use a power cord 25 metres or shorter, rated up to 25 amps. Use a ProGuard and electrical surge protection plug, especially in smaller units, such as 390, 395, 490, 495 and 595. If you need to work over a longer distance, add additional hose not cord. See hose information.
| Product | Data Sheet | Hose (no less than) |
Filter | LP tip (yellow) |
FFLP tip (green) |
Safety mask |
|---|---|---|---|---|---|---|
| Waterborne topcoats | ||||||
| Aquaclear | D59 | 1/4 | 60 mesh (black) | - | 414 | PV2 |
| Ceiling Paint | D305 | 1/4 | 60 mesh (black) | 517 | 516 | PV2 |
| ClinicalCote | D318 | 1/4 | 60 mesh (black) | 515 | 516 | PV2 |
| CyberCote | D323 | 1/4 | 60 mesh (black) | 515 | 516 | PV2 |
| Enamacryl | D309 | 1/4 | 60 mesh (black) | 413 | 414 | PV2 |
| FX Metallic | D309a | 1/4 | 30 mesh (grey) | - | 516 | PV2 |
| Hi-Glo | D31 | 1/4 | 60 mesh (black) | 515 | 414 | PV2 |
| Lumbersider Low Sheen | D34 | 1/4 | 60 mesh (black) | 515 | 516 | PV2 |
| Lumbersider Matt | D327 | 1/4 | 60 mesh (black) | 515 | 516 | PV2 |
| Lustacryl | D310 | 1/4 | 60 mesh (black) | 413 | 412 | PV2 |
| Room Velvet | D320 | 1/4 | 60 mesh (black) | 517 | 516 | Carbon filter |
| Sonyx 101 | D30 | 1/4 | 60 mesh (black) | 515 | 516 | PV2 |
| SpaceCote Flat | D314 | 1/4 | 60 mesh (black) | 515 | 516 | PV2 |
| SpaceCote Low Sheen | D311 | 1/4 | 60 mesh (black) | 515 | 516 | PV2 |
| Summit Roof Commercial Spray Satin | D315S | 1/4 | 60 mesh (black) | 515 | 516 | PV2 |
| Summit Roof Metallic | D315M | 1/4 | 30 mesh (grey) | 517 | - | PV2 |
| Summit Roof Semi-Gloss | D315S | 1/4 | 60 mesh (black) | 515 | 516 | PV2 |
| Zylone Sheen | D302 | 1/4 | 60 mesh (black) | 515 | 516 | PV2 |
| Product | Data Sheet | Hose (no less than) |
Filter | LP tip (yellow) |
FFLP tip (green) |
Safety mask |
|---|---|---|---|---|---|---|
| Primers/sealers/undercoats | ||||||
| Acrylic Undercoat | D404 | 1/4 | 60 mesh (black) | 515 | 516 | PV2 |
| Broadwall 3 in 1 | D810 | 3/8 | 30 mesh (grey) | 523 | - | PV2 |
| Broadwall Surface Prep & Seal | D807 | 1/4 or 3/8 | 30 mesh (grey) | 523 | - | PVS |
| Broadwall Waterborne Wallboard Sealer | D403 | 1/4 | 60 mesh (black) | 517 | - | PV2 |
| Concrete Primer | D405 | 1/4 | 60 mesh (black) | 517 | - | PV2 |
| Decorator First2Finish | - | 1/4 or 3/8 | 30 mesh (grey) | 517 | 516 | PV2 |
| Enamel Undercoat | D44 | 1/4 | 60 mesh (black) | 515 | 414 | Carbon filter |
| Galvo One | D41 | 1/4 | 60 mesh (black) | 515 | 414 | Carbon filter |
| Galvo-Prime | D402 | 1/4 | 60 mesh (black) | 517 | 516 | PV2 |
| Laminate and Melamine Primer | D414 | 1/4 | 100 mesh (blue) | 411 | 412 | Carbon filter |
| Limelock | D809 | 1/4 | 60 mesh (black) | 413 | 414 | PV2 |
| Quick Dry | D45 | 1/4 | 60 mesh (black) | 515 | 516 | PV2 |
| Sureseal | D42 | 1/4 | 100 mesh (blue) | 413 | 414 | Carbon filter |
| Timber Surface Prep | D814 | 3/8 | 30 mesh (grey) | 523 | - | Carbon filter |
| Wood Primer | D40 | 1/4 | 60 mesh (black) | 515 | 414 | Carbon filter |
| Product | Data Sheet | Hose (no less than) |
Filter | LP tip (yellow) |
FFLP tip (green) |
Safety mask |
|---|---|---|---|---|---|---|
| Solventborne topcoats | ||||||
| Lusta-Glo | D33 | 1/4 | 100 mesh (blue) | 413 | 412 | Carbon filter |
| Qristal Clear Polyurethane | D52 | /14 | 60 mesh (black) | 413 | 412 | Carbon filter |
| Super Gloss | D32 | 1/4 | 100 mesh (blue) | 413 | 412 | Carbon filter |
![]() Get inspired ! Subscribe
Get inspired ! Subscribe ![]() Get saving ! Apply for a DIY card
Get saving ! Apply for a DIY card
![]()
Can't find what you're looking for? Ask us!
Company profile | Terms | Privacy policy | Quality and environmental policy | Health and safety policy
Colours shown on this website are a representation only. Please refer to the actual paint or product sample. Resene colour charts, testpots and samples are available for ordering online. See measurements/conversions for more details on how electronic colour values are achieved.
What's new | Specifiers | Painters | DIYers | Artists | Kids | Sitemap | Home | TOP ⇧

