DIY project from NZ Gardener magazine
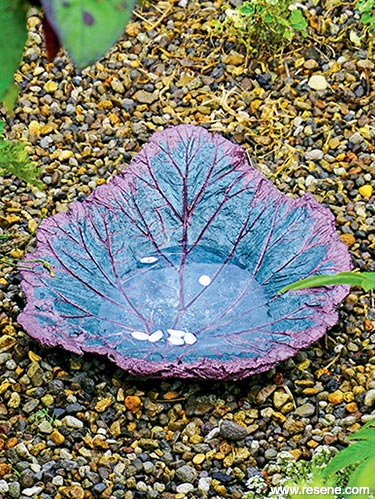
Jacob Leaf sculpts a birdbath out of a humble rhubarb leaf.
Cost: $ $25 excluding Resene products
Step one
Step two
Step three
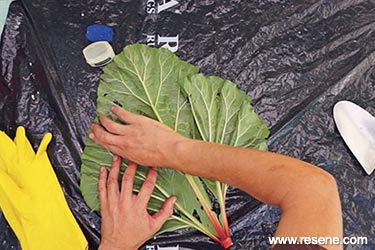
Step one: Choose a large leaf, such as a rhubarb, alocasia, taro or pumpkin leaf. Lightly cover the underside of the leaf with petroleum jelly or cooking oil. If your leaf has any holes in it, patch them up using torn-off pieces from another leaf.
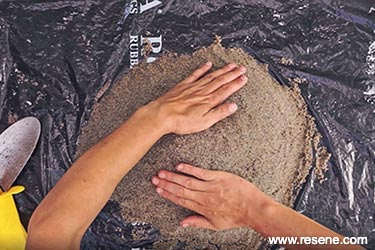
Step two: On the rubbish bag, make a dome-shaped pile of sand that is large enough for you to lay the entire leaf over. The higher the dome, the deeper the bowl will be (keep in mind that little birds will not want it to be too deep). Dampen the sand with water.
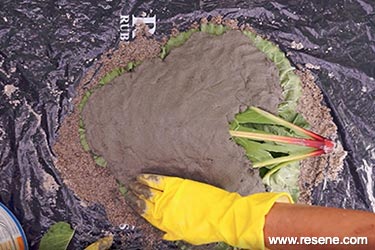
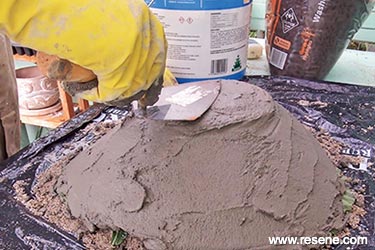
Step three: Mix the mortar with water until it is the consistency of a thick biscuit mix. Lay the leaf top-side down on the mound of sand. If the veins are thick and not pliable, snip them so they curve over the mound of sand. Wearing rubber gloves and using the pointing trowel or the spatula, apply the mortar to the leaf, starting at the midrib (the strong centre vein), then spreading it out to the edges. The mortar should be about 2.5-3cm thick in the middle and taper off to about 1-1.5cm at the edges. Once you’re happy with the thickness, level out a flat spot in the middle of the leaf so that the birdbath will sit flat when upright. Loosely cover the birdbath with the rubbish bag – this will help the concrete to dry evenly. You can also sprinkle it with water occasionally to prevent it from drying too fast and cracking. Leave to set for at least three days.
Step three (a)
Step four
Step five
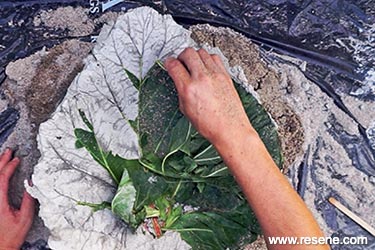
Step four: Once dry, carefully turn over the birdbath and peel off the attached leaf; you might need to use a nail or other suitable tool to dislodge the midrib and veins. Brush off any loose mortar or dust. Leave sitting upright to dry for another day before painting.
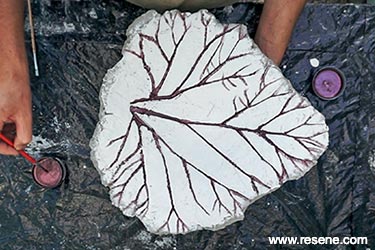
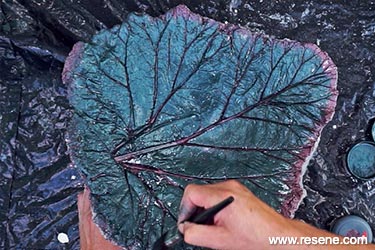
Step five: Apply primer to the birdbath, then use a small brush to paint the recessed lines of the midrib and veins. Once dry, lightly brush the leaf colour onto the rest of the leaf, avoiding the recessed lines. When the paint is dry, spray the birdbath with clear acrylic gloss to protect it from the elements.
Step five (a)
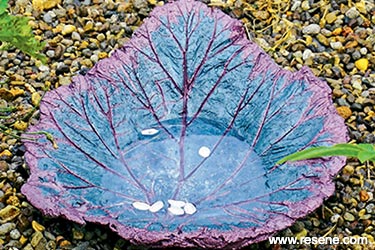
Bird bath detail
Project by Jacob Leaf.
› Download a PDF of this project › Watch a video of this project
![]() Get inspired ! Subscribe
Get inspired ! Subscribe ![]() Get saving ! Apply for a DIY card
Get saving ! Apply for a DIY card
![]()
Can't find what you're looking for? Ask us!
Company profile | Terms | Privacy policy | Quality and environmental policy | Health and safety policy
Colours shown on this website are a representation only. Please refer to the actual paint or product sample. Resene colour charts, testpots and samples are available for ordering online. See measurements/conversions for more details on how electronic colour values are achieved.
What's new | Specifiers | Painters | DIYers | Artists | Kids | Sitemap | Home | TOP ⇧

