Craft - inspired by Resene, from Little Treasures magazine
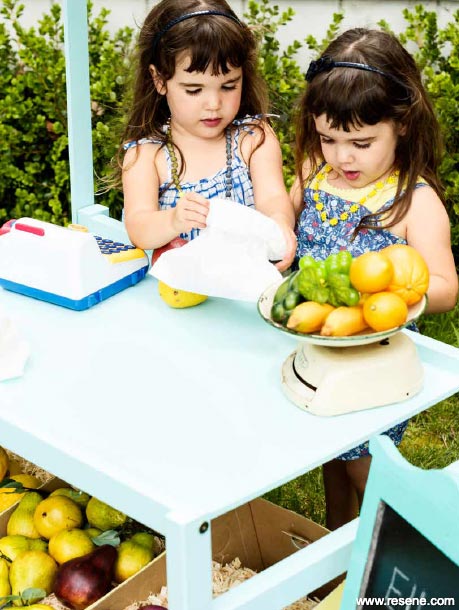
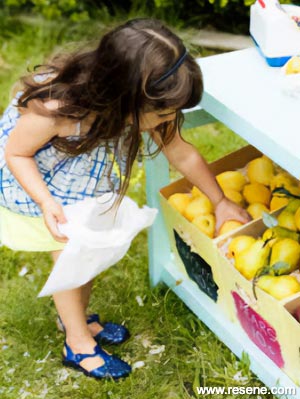
Whether your budding entrepreneur wants to sell home-grown produce to the neighbours or just play pretends, she will love this cute stall.
Whether your budding entrepreneur wants to sell home-grown produce to the neighbours or just play pretends, she will love this cute stall.
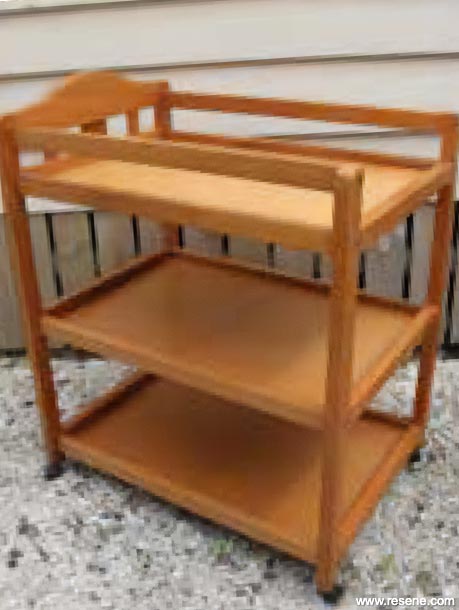
Before

After
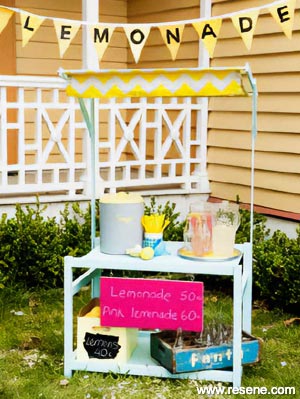
After
Remove castors if your change table has them, and dismantle the table. Measure 600mm up from the bottom of both end pieces and cut the excess part off.
Drill 16mm holes in one end of each 1400mm length of pine, and smaller holes (to suit your change table) in the same positions as the shelves. Drill a 7mm hole 215mm from the end with the 16mm hole.
Drill 16mm holes in each end of the 600mm lengths. Measure 275mm from one end and drill a 7mm hole.
Hem the fabric so finished size is 830mm, with a wide enough hem at one end to fit the dowel through. Place canopy on market stand and pin in place over second dowel – remove and sew another seam large enough to fit the other piece of dowel. Cut and hem the other end so you end up with a 10cm long hanging fringe piece.


Paint everything but the two pieces of dowel and the inside of the holes that hold the dowel with Resene Quick Dry sealer undercoat and then two top coats of Resene Lustacryl paint in Resene Aqua.
For the blackboard sign, sand both sides and all edges of the plywood, paint a coat of Resene Quick Dry sealer on both sides. Leave edges unpainted. When dry, paint one side with two coats of Resene Blackboard Paint pink and the other with two coats of Resene Blackboard Paint black. Re-sand edges if any paint bleeds onto them. Drill and attach two eyelets into one of the long sides. And drill and attach two cup hooks to the undersides of the shelves of your stand.
To erect your market stall, attach 1400mm lengths to each of the back sides of the change table by inserting the bolt through the timber and the timber of the change table and into the lower shelf. if the change table’s original bolts aren’t long enough, replace them with hexagon-ended bolts that are the same diameter but 10mm longer. Repeat this for the upper shelf. Attach the shelf on the front side by inserting the bolt through the change table and into the shelf on each side.
Insert dowel into the back seam in fabric canopy and then into 1400mm and 600mm timber pieces on each side. Attach 400mm bracing pieces using the 25mm bolts and wingnuts to secure.
Place other piece of dowel through front seam in canopy and insert dowel into holes in the front of the 600mm
Models: Ella and Meah Gray. Models wear clothes from Cotton On Kids. Thanks to the Green Keeper Cafe. Bunting from huntingletterflags.com. Sugar container, spot container, coke bottles, bottle box, tray and blackboard all from borrowed.co.nz.
Created by Sarah Eberhardt. Photography by Mike Rooke/Bauer studio.
April 2014
Kid's Bedroom Decorating Ideas
View more decorating ideas for kids from Little Treasures magazine in the Resene kid's bedroom inspiration gallery.
![]() Get inspired ! Subscribe
Get inspired ! Subscribe ![]() Get saving ! Apply for a DIY card
Get saving ! Apply for a DIY card
![]()
Can't find what you're looking for? Ask us!
Company profile | Terms | Privacy policy | Quality and environmental policy | Health and safety policy
Colours shown on this website are a representation only. Please refer to the actual paint or product sample. Resene colour charts, testpots and samples are available for ordering online. See measurements/conversions for more details on how electronic colour values are achieved.
What's new | Specifiers | Painters | DIYers | Artists | Kids | Sitemap | Home | TOP ⇧


