Craft - inspired by Resene, from Little Treasures magazine
Whether your child is a curator of clutter or you’ d simply like to address the obstacle course that is their bedroom floor, this clever peg board organiser is a top-notch solution.
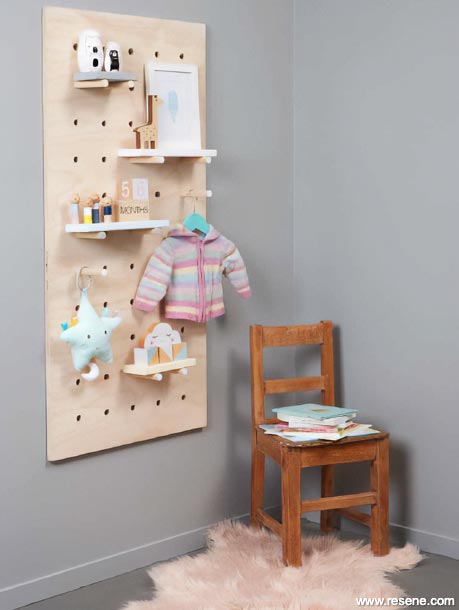
When planning a nursery it’s important to consider how the organisation of toys/books/ornaments will affect the design. This modern peg board and cloud-shaped shelves add interest, as well as functionality. You don’t have to spend a fortune on redesigning a room. Just follow our easy instructions and create a whole new look with two simple, yet effective, pieces.
The peg board can adapt through the years as your child grows and the room décor changes. As your child gets older, change the look by painting the shelves, or the board, in your child’s current favourite combination of colours.
To mark the centre for the drill holes, use a long ruler and a pencil and draw a little line, both horizontally and vertically, every 100mm (10cm); so the lines intersect. When you are done you will have 55 little cross marks on the sheet of ply.
Before drilling holes, elevate the plywood up off your work surface by placing something, such as spare timber, under two of the edges. Attach an 18mm speedbor drill bit to a drill, place pointed end of the speedbor in the middle of your first cross, and drill until you have created a hole. Repeat for the remaining holes.
Sand the edges of the board, each hole and the front of the ply.
Paint ply with one or two coats of Resene Colorwood Whitewash, use an old cloth to rub off any excess. When dry, coat with two coats of Resene Aquaclear, leaving to dry between coats.
Place dowel in your mitre box and use the guide on the mitre box to cut straight across the dowel – cut the dowel into 12cm lengths, sand ends and edges. You may also need to sand one end a little so the dowel will fit into the holes a little easier.
Paint ends of the dowel pegs with two coats of the Resene colours and let dry.
To make the shelves, use a mitre box to cut the board into different size pieces (we cut ours into 300mm, 200mm and 150mm size lengths). Sand and paint with a coat of Resene Quick Dry sealer undercoat then two topcoats of Resene Lustacryl, Resene Half Stack, Resene Melting Moment, Resene Slipper, Resene Half Reservoir and Resene Foam, leaving to dry between coats.
Screw the pegboard to your wall and push in pegs and place shelves on the pegs to suit what you want to display.
If you’re concerned about the shelves staying put, sitting on the dowel pieces, screw down through the shelf into the dowel. Fill with filler before painting the shelf with sealer undercoat and topcoats.
To attach to the wall, you can either screw through the front of the peg board into studs or nogs in your wall, or you can create a French cleat by cutting a piece of timber on a 45-degree angle, screw one piece to the wall and the other to the back of the peg board and slot together.
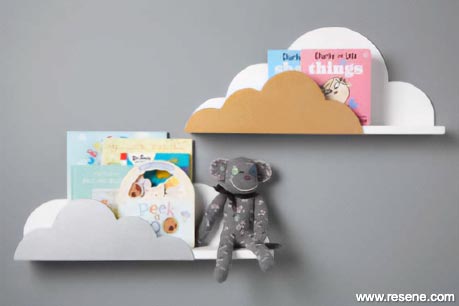
Use our template to cut out two large and two small cloud shapes on paper.
Place paper template on your MDF and draw around with a pencil then use a jigsaw to cut out cloud shapes.
Screw large MDF clouds to the back of the pine board and the small MDF clouds to one end of the front of the shelf, making sure you push the screw well into the MDF so it can be filled and painted and screws do not show. You may need to use a countersink tool to create more of a hole for the screw to nestle into.
Fill holes with filler, leave to dry then sand smooth.
Paint shelf with a coat of Resene Quick Dry sealer undercoat and leave to dry.
Paint large cloud, inside (back side) of small cloud, sides, shelf and underside with two coats of Resene Lustacryl Cotton Wool, leaving to dry between coats.
Paint front side of small cloud one in Resene Solid Gold and the other in Resene So Cool.
To hang, screw through the large cloud into studs or nogs in your wall – screws will be hidden when you fill your shelf with books.
Instead of clouds, you could use another of your child’s favourite shapes for the bookshelves – trains, animals, flowers or butterflies could all be used as inspiration to create a shape for the bookshelves.
Create an interactive peg board. Paint it with Resene Blackboard Paint (which comes in colours as well as black) and then you can label what goes where using chalk.
Instead of a single colour finish, paint a picture onto the peg board. It could be something as simple as a rainbow of colour, or a detailed picture of one of your child’s favourite scenes. This is a handy way to introduce colour to a space and for the peg board to look like a feature even when only some of the spaces are being used.
As well as a peg board for their room, what about one for the garage and the playroom? You might even find one handy in a home office.
Hang a small painted metal pail near the bottom to collect up all those odd bod bits and pieces that every child has that never quite belong anywhere.
Let your child help choose their favourite colours to use. Show them the Resene KidzColour collection and let them point out the ones they like best.
Paint a night scene onto the back of the peg board and use Resene FX Nightlight for stars and planets. Then, when the lights are turned off at night, the stars and planets will softly glow.
Help your child remember what goes where. Paint each shelf front in Resene Blackboard Paint then write on it what goes there. Very handy at tidy up time!
Created by Sarah Eberhardt.
Photography by Bryce Carleton.Kid's Bedroom Decorating Ideas
View more decorating ideas for kids from Little Treasures magazine in the Resene kid's bedroom inspiration gallery.
![]() Get inspired ! Subscribe
Get inspired ! Subscribe ![]() Get saving ! Apply for a DIY card
Get saving ! Apply for a DIY card
![]()
Can't find what you're looking for? Ask us!
Company profile | Terms | Privacy policy | Quality and environmental policy | Health and safety policy
Colours shown on this website are a representation only. Please refer to the actual paint or product sample. Resene colour charts, testpots and samples are available for ordering online. See measurements/conversions for more details on how electronic colour values are achieved.
What's new | Specifiers | Painters | DIYers | Artists | Kids | Sitemap | Home | TOP ⇧