From Habitat magazine - issue 10
Interior designer and tutor Debbie Abercrombie explains how to create your renovation master plan – a swatch board.

Debbie Abercrombie
Whether you’re renovating the whole house, a few rooms or just one space, having a master plan will save you time, effort and stress.
In interior designer terms, a master plan comes in the form of a swatch board – literally a board on which you paste samples of the colours, materials and fabrics you are going to use.
Debbie Abercrombie has put together this example, for a whole house renovation, which will give the finished result a cohesive look. Even if it takes you five years to complete a renovation, once you have created your swatch board, you can keep referring back to it to make sure you don’t wander off track.
While some of the original products chosen may change, or become unavailable, you can always find new ones that fit with the rest of the board. Also, if you feel your tastes change slightly, you can modify the board to suit, without radically changing your direction and therefore ending up with a living room renovated last year that looks completely different to the bedroom you’re planning for next year.
As well as products and colours for the board, Debbie says to collect magazine clippings, product brochures and images that you like, to put in a scrapbook or file box as these can also act as a guide when collecting your samples. For example, if you find yourself collecting ethnic-patterned images, you can then ask the various fabric showrooms for current examples of this style, and maybe end up with the Coyoacan fabric seen at the top of our board.
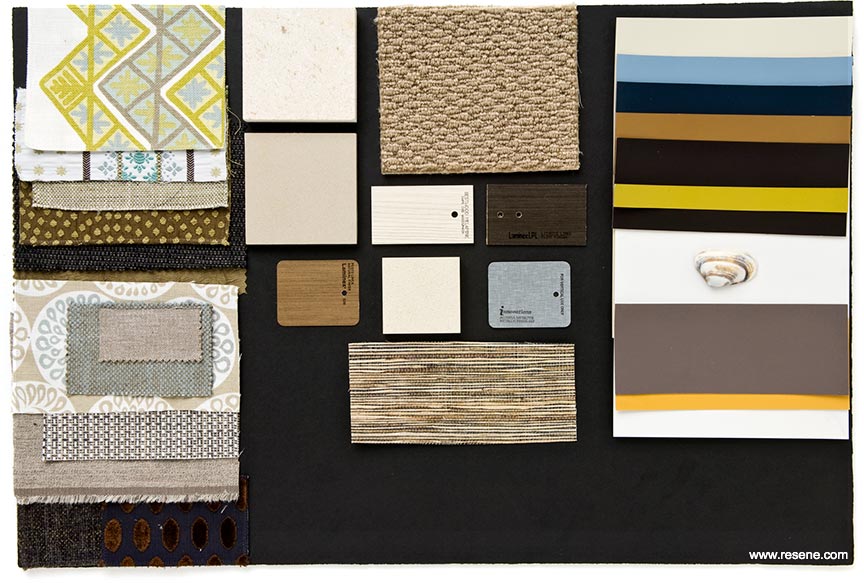
A good way to start any interior design scheme is to find an object to use as inspiration. Here, we have used a shell but it could be anything – a flower or part of the garden, a painting, a view, a piece of fabric.
Debbie likes to gain her inspiration from nature: “Nature is never wrong. You will find that the colours found in nature, in the environment around you, always work well together.”
Colours found within these objects are never simple. Most of us would assume a shell is white or cream, but this particular one also has burnt orange, blue/grey and deep brown as well as a couple of creamy tones. Forget your assumptions and look hard at the object you have found, to identify the various colours.
The next step is to then match those colours to corresponding Resene shades. You won’t actually use all of these paints as some will only represent accent colours for upholstery or cushions, but this will give you a colour palette to keep referring back to.
Get the various testpots from your local Resene ColorShop and paint up A4 sheets of colour or buy Resene drawdowns. Then put them in order of the amount of space they will be in the room, ie use the whole A4 sheet for the colour/s you will use for the walls, and the colour that represents the floor, then place smaller strips of the other colours on top, ie those that represent the curtains, sofa coverings, kitchen cabinetry, cushions etc.
Here, Debbie has used Resene Quarter Silver Sand and Resene Sisal as her base colours, and overlaid the others in various proportions.
Once your colour palette is arranged, Debbie advises to always choose your floor coverings next – the timber, carpet and tiles. “The floor is the largest surface area, it’s the greatest expense and the surface you are least likely to change in a hurry. This is the most important aspect to get right.” And whatever you choose, lay it alongside the colour palette to make sure it fits in.
Next comes any other horizontal surfaces in the house, such as the kitchen benchtops, vanities and cabinetry. Again, lay your laminate chips or composite stone samples alongside your colour palette.
The final component of your board is the fabrics, for curtains and blinds, upholstery and cushions. This can be the most confusing part, with the plethora of fabrics on the market. Debbie advises choosing a couple of plain neutral fabrics as, say, the main window and sofa coverings, then using more interesting patterned fabrics for cushions and chairs.
In this scheme, while all of the fabrics work together, they are grouped into a darker, more formal cluster which would be good for a smaller sitting room or main bedroom, and a lighter, more casual cluster, perfect for a family room.
Debbie Abercrombie has her own interior design consultancy, she teaches interior design at Te Tuhi Centre for the Arts in Pakuranga and was a tutor for five years with the Wellington Polytechnic Interior Design correspondence course.
Fabric cuttings, from top
Meridian Coyoacan, colour Chartreuse from Mokum – use for feature chair or cushions; Meridian Moldova Stripe from Mokum – use for feature chair or cushions; Ficus, colour Green Tea from Mokum – use to cover sofa or chairs; Meridian Angkor watt from Mokum – use for feature chair or cushions; Tuscana from Mokum – use to cover sofa or chairs; James Dunlop Celine – use for curtains; Warwick Glitz – use for cushions; Meridian Matarita from Mokum – use for chair or cushions; Romo Peron, colour French Blue from Seneca – use to cover sofa or chairs; Souk, colour Marble from Mokum – use to cover sofa or chairs; Resene Curtain Collection Balance, colour Stone – use for curtains; Zimmer + Rohde New York from Mokum – use to cover sofa or chairs; Arosa from Mokum – use to cover sofa or chairs.
Flooring and laminate chips, from topEuropean Ceramics limestone; European Ceramics porcelain tile, Saxon Sand; Cavalier Bremworth Pebbledash wool carpet, colour Natural Tan; Bestwood Laminate Cape Cod woodgrain; Laminex Licorice Linea flint finish; Laminex Pesto Linea natural finish; Quarella Industrial Stone composite, colour Crema Clara; Innovations Alumina Metaltex metallic finish, and; Vision wallpaper, no 21411.
words: Sharon Newey
pictures: Mark Heaslip
Search habitat magazine stories
Printed copies of habitat highlights are available from late March 2024 at Resene ColorShops and resellers, while stocks last. You can view back issues of habitat magazine online.
Specifiers:
If you have an idea, project or story that you think would suit habitat, we’d love to hear from you. Please drop us an email with your details and include photos if submitting a project.
Sign up for a DIY card and Save! Australia | New Zealand
![]() Get inspired ! Subscribe
Get inspired ! Subscribe ![]() Get saving ! Apply for a DIY card
Get saving ! Apply for a DIY card
![]()
Can't find what you're looking for? Ask us!
Company profile | Terms | Privacy policy | Quality and environmental policy | Health and safety policy
Colours shown on this website are a representation only. Please refer to the actual paint or product sample. Resene colour charts, testpots and samples are available for ordering online. See measurements/conversions for more details on how electronic colour values are achieved.
What's new | Specifiers | Painters | DIYers | Artists | Kids | Sitemap | Home | TOP ⇧


