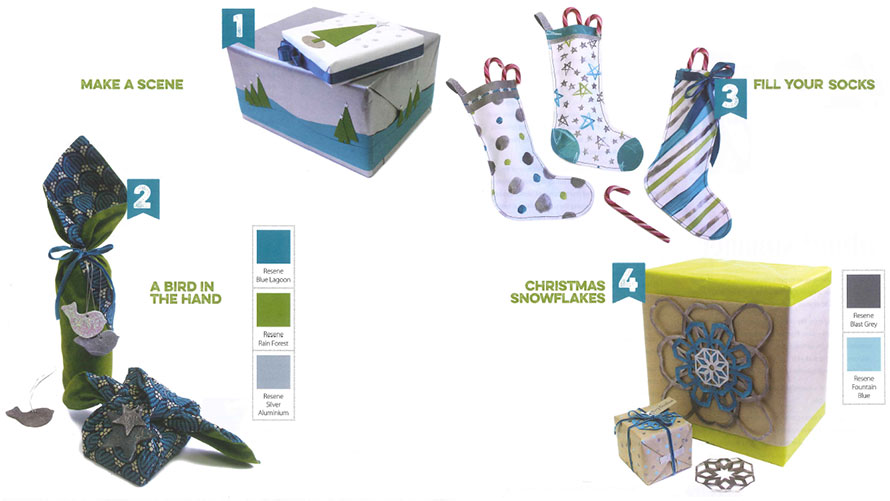
How to make Christmas wrapping paper, a Christmas stocking, fabric gift wrapping, and snowflakes to decorate packages.
Make a scene
How to: Do something a little different and create your own custom wrapping paper this Christmas. Create a landscape by using strips of paper - layer one over the other and glue in place. Populate the landscape with simple Christmas trees and top them off with sparkly stars - a star cutter and some glittery scrapbooking paper will do the trick. For something special, add a ribbon and secure in place with glue.
A bird in the hand
How to:
Fabric - Select two contrasting fabrics. I chose a pattern and a bold colour. Cut the fabric into squares - mine were 25cm by 25cm (the right size for wrapping a smaller gift). Pin the fabric together and sew a seam around the outside, 5cm from the edge. Iron the seams flat and hand stitch the open end closed.
Clay birds - Roll out air-drying clay 5mm thick. Cut out your desired shape using a cookie cutter. Use a straw to cut a hole out of the clay - this is to run a ribbon through later. Leave the clay shapes to dry overnight. Once the shapes are dry, paint with Resene Blast Grey 3 or sprinkle with glitter to seal the clay, then thread a ribbon through.
Wrapping the gift - The size of the gift is going to dictate how you tie the fabric. The small square parcel was tied by putting the box in the centre of the fabric, bringing the diagonal corners together and tying them in a knot. Repeat with the other two corners, looping the decoration through the knot and tie it off.
Fill your socks
How to: Draw the shape of a Christmas stocking on two pieces of paper and get the kids involved using Resene paints. Once the paint has dried, put the two sides of the stockings together (right side out) and sew a 5mm seam around the edge, leaving the top open to fill with goodies.
Christmas snowflakes
How to: Select your wrapping paper (or if you only have brown paper at hand, you can decorate it with with painted polka dots - I used Resene Blast Grey 3 and Resene Fountain Blue). To create the snowflake, cut an A4 page into a square and then fold it in half four times. Cut different shapes
out of the folded paper, making sure the overall piece of paper stays intact. Unfold the snowflake, lay it flat and paint it using Resene Blue Lagoon, Resene Rain Forest, Resene Silver Aluminium or Resene Blast Grey 3. Once the paint is dry, place the snowflake on top of the gift and secure it in place with a ribbon, or glue it down and layer with smaller snowflakes.
Download as pdf Return to more projects
Order online now:
Testpots |
Paints |
Primers and Sealers |
Stains |
Clears |
Accessories
![]() Get inspired ! Subscribe
Get inspired ! Subscribe ![]() Get saving ! Apply for a DIY card
Get saving ! Apply for a DIY card
Can't find what you're looking for? Ask us!
Company profile | Terms | Privacy policy | Quality and environmental policy | Health and safety policy
Colours shown on this website are a representation only. Please refer to the actual paint or product sample. Resene colour charts, testpots and samples are available for ordering online. See measurements/conversions for more details on how electronic colour values are achieved.
What's new | Specifiers | Painters | DIYers | Artists | Kids | Sitemap | Home | TOP ⇧

