
Refresh a retro coffee table without losing its character.
Resene upcycling for good with Sarah Herring - Project 59
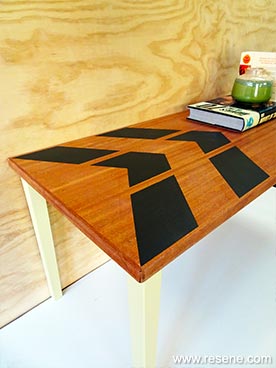
Finished project
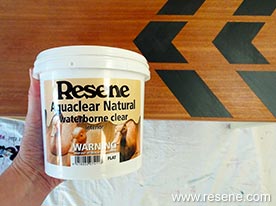
You will need: Sandpaper or electric sander, testpot brushes and/or roller, Resene Quick Dry waterborne primer undercoat, painters masking tape (and ruler, pencil, scissors for measuring), Resene testpots in your choice of colours; Sarah chose Resene Yuma and Resene Karaka and Resene Aquaclear Natural.
Top tips: Resene Aquaclear comes in a range of finishes – gloss, semi-gloss, satin and natural. Usually the higher the gloss level the easier the surface will be to wipe clean.
If you like to DIY furniture items often, Sarah recommends investing in an electric sander. For a home DIY enthusiast they can save you a lot of time and elbow grease and are worth the investment if you plan to do a number of projects.
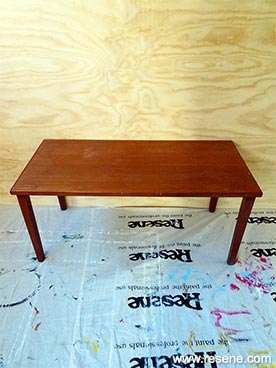
Step one: A classic piece of retro furniture like this coffee table is always a great find.
This one was in fantastic condition, but it had a few wonky legs that need to be screwed back into place. It’s always important to check secondhand furniture items for repairs before you start applying any paint!
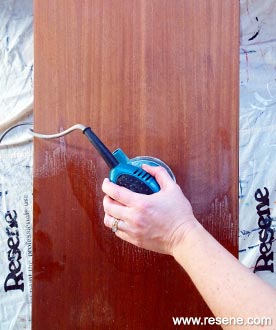
Once you have checked the table is sound and fixed any loose parts, give the entire table a thorough sand to remove a build-up of old lacquer and stain. Sarah did this with an electric sander, however you could use sandpaper and do it by hand.
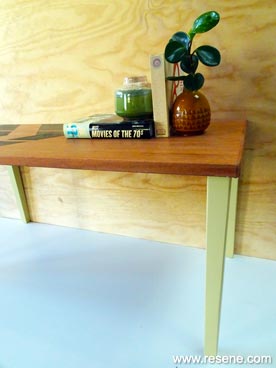
Step two: Once Sarah had sanded back the whole table, she found it had a beautiful light wood grain that she wanted to preserve. So Sarah decided to paint just the table legs and apply a stencil design to the table top, so the natural timber of the table could still be visible.
Decide which areas on your table you want to paint. Apply one coat of Resene Quick Dry waterborne primer undercoat to the legs using a testpot brush.
Step three: Once the primer is dry, apply two coats of your chosen topcoat colour. Sarah used Resene Yuma for the table legs. She chose this colour because it felt fresh and new, but still evoked retro vibes.
 Step 1
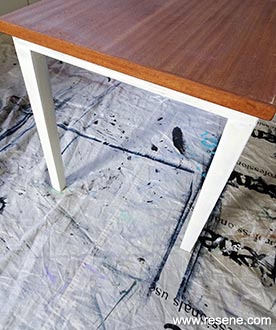 Step 2
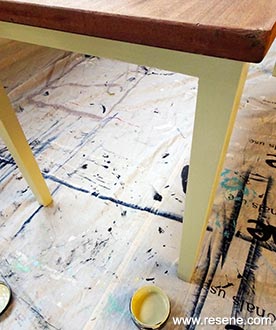 Step 3
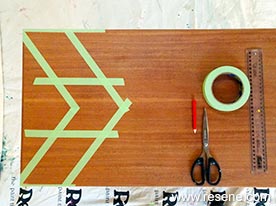
Step four: Mask out a retro pattern on the table top using painters’ masking tape. Sarah designed and painted arrow shapes with two coats of Resene Karaka. Once dry, remove the masking tape carefully.
 Step 4
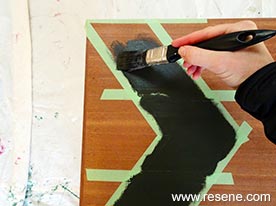 Step 4
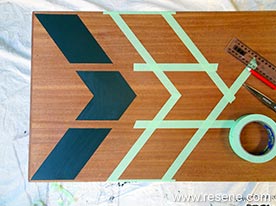 Step 4
Step five: To protect the table top artwork while still maintaining a matte finish, Sarah applied three coats of Resene Aquaclear Natural using a testpot brush. For a harder finish you could use a higher sheen Resene Aquaclear urethane.
And there you have it! A fresh new look for a retro coffee table. Sometimes the best part of upcycling something is updating it while still honouring its roots.
 Step 5
 Finished photo
Upcycling for Good
You can find a huge range of treasures, from ornaments and picture frames, to furniture and toys at your local Salvation Army store that you can easily upcycle with a little Resene paint and some imagination.
"Our Family Stores are full of treasures generously donated by members of the public. We value these donations and try our hardest to re-purpose and sell as much as possible. We’re all about re-using and recycling, so teaming up with Resene on Upcycling for Good was a perfect match. Resene’s products and tips are a natural fit with our pre-loved furniture and accessories, which are usually great quality but could sometimes do with a lick of paint to ensure they fly off the shelves.
Each year, nationally, our stores save 16,000 tonnes from landfill. This initiative increases the value of the donated product, improves the range of goods for our customers, and furthers The Salvation Army’s mission and Resene’s community activity.” Gareth Marshall, The Salvation Army's National Family Store Manager.
![]() Get inspired ! Subscribe
Get inspired ! Subscribe ![]() Get saving ! Apply for a DIY card
Get saving ! Apply for a DIY card
![]()
Can't find what you're looking for? Ask us!
Company profile | Terms | Privacy policy | Quality and environmental policy | Health and safety policy
Colours shown on this website are a representation only. Please refer to the actual paint or product sample. Resene colour charts, testpots and samples are available for ordering online. See measurements/conversions for more details on how electronic colour values are achieved.
What's new | Specifiers | Painters | DIYers | Artists | Kids | Sitemap | Home | TOP ⇧

