Resene – Style, from Homestyle magazine
A favourite childhood art project gets a very grown-up makeover
Paint a wall mural
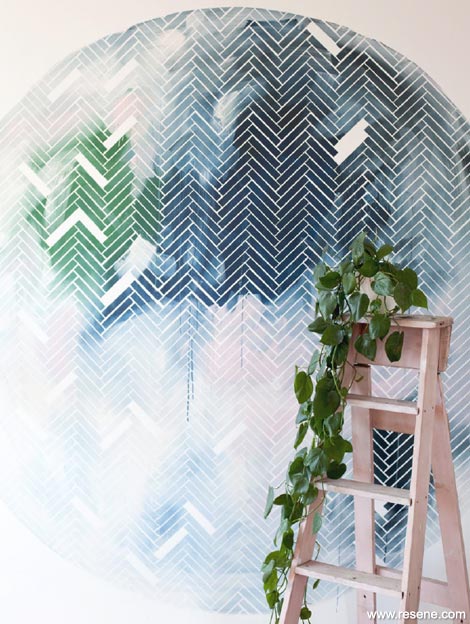
I grew up in an incredibly creative home. There was always a project on the go – something being made, painted or re-purposed. I remember my mother making this giant wall hanging. It hung at the end of the dining table, and I would sit staring at it – this large circle with a great mix of colours and pattern. She had used this simple technique, paint and peel. It has always been something I wanted to try. But the folly of such a flexible technique is deciding where to apply it – as a wall hanging, like my mother did? Or a canvas, a bedspread, a piece of furniture, or as permanent artwork on a wall... like I eventually chose. The world really is your paintable oyster, so go forth and conquer it with paint!
You will need:
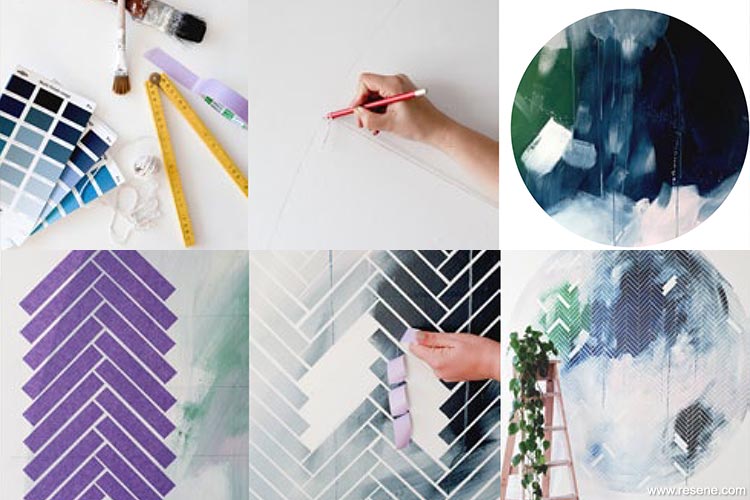
Resene waterborne enamel in your choice of Resene Enamacryl gloss, Resene Lustacryl Semi-gloss, Resene SpaceCote Low Sheen or Resene SpaceCote Flat. Plus, a paint brush, delicate painter's tape, pencil, string, thumb tack, level and ruler.
Instructions:
Draw your circle. Decide on the diameter of your circle (mine is 2300mm wide). Measure half the diameter onto your piece of string, then cut. Tie your pencil to one end of the string. Pin the opposite end into the wall with a thumb tack, where you want the centre of your circle to be. Pull the string taut and draw a full circle outline – essentially using a large-scale compass.
Paint your creation. Paint your mural inside the circle using whatever colours and paint technique you like. I used Resene Lustacryl in Resene Celestial Blue and Resene Milk White by Karen Walker, Resene San Felix, Resene Blue Charcoal and Resene Gelato. I painted splotches and drips, using large brush strokes and blended them together while the paint was still wet. If you have kids you could even let them loose on this one. Then let it dry overnight – 12-48 hours is recommended.
Draw a grid over the painting. Once the paint is dry, start drawing a grid over the top of the mural with a pencil – this will make sure your overlaying pattern is aligned. Make vertical lines 100mm apart, checking they're straight with the level. Then do the same horizontally, 100mm down, also using the level.
Tape her up. I chose a herringbone pattern here* – note, it's important to be quite accurate with this one, as each millimetre counts and can shift the whole line. To achieve this, cut each piece of tape to 140mm. Then follow your grid, with the top corner of your tape hitting the vertical line. Keeping the same angle and width apart, follow the line down, then repeat on the other angle for the next row. Cover the entire painting this way.
Paint over it. Finally, it's time to paint over that puppy! I rolled my favourite, Resene Black White, did a second coat two hours later, then let it dry overnight.
Strip off the tape. To reveal your pattern and the painting beneath, carefully peel away the tape making sure the paint is completely dry (if the paint bleeds, allow more time for drying). And you're done! Believe me, this one's worth the effort.
Choosing colours:
The all-important colour choice – it can be an overwhelming process, but here are a few tips to help. Firstly, I began with an inspiration point. This can really be anything – a piece of fabric, the change of season or a current colour crush. The next step is to keep in mind where the artwork will hang. Maybe you're working with neutrals for the lounge, perhaps an eye-catching entrance – or maybe you want something bright and bold for the kids' room. Wherever it may be, think of the surroundings and the feeling you want it to portray. I was influenced by an artwork, and wanted to create something with a sense of ease and serenity for our bedroom. So I chose cooler colours, keeping it to a moody blue, a hint of fresh green, a soft pink and tying it together with a milk white.
* You can choose whichever pattern you like – dots, crosses, lines, letters even! Just remember, anything that's taped will show the painting that's beneath it in the end.
Gem Adams is an all-round style betty; she has a knack for turning nothing into something. Follow her at blackbirdgem.blogspot.com
Project and Photography: Gem Adams.
▸ Download a PDF of this article
Projects from Homestyle magazine
View more project ideas from Homestyle magazine in the Resene weekend DIY projects section.
![]() Get inspired ! Subscribe
Get inspired ! Subscribe ![]() Get saving ! Apply for a DIY card
Get saving ! Apply for a DIY card
![]()
Can't find what you're looking for? Ask us!
Company profile | Terms | Privacy policy | Quality and environmental policy | Health and safety policy
Colours shown on this website are a representation only. Please refer to the actual paint or product sample. Resene colour charts, testpots and samples are available for ordering online. See measurements/conversions for more details on how electronic colour values are achieved.
What's new | Specifiers | Painters | DIYers | Artists | Kids | Sitemap | Home | TOP ⇧


