Resene – Paint trends, from Homestyle magazine
Let the kids escape into their own little worlds with the help of whimsical décor that encourages magical thinking.
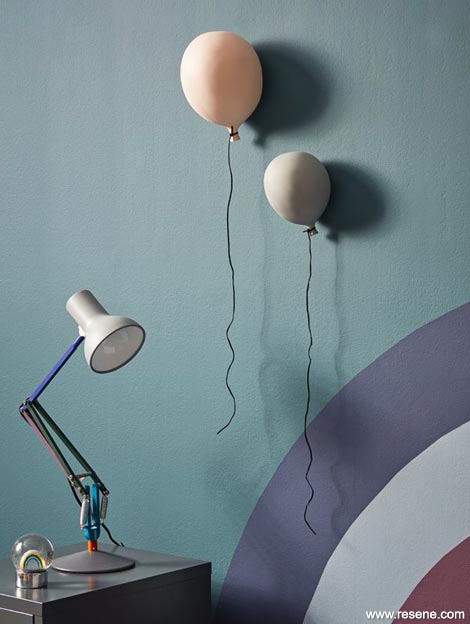
Don’t be afraid of the dark — this richly toned rainbow ‘headboard’ invites the soundest of sleeps.
The dimensions of your wall and bed will determine the size of your rainbow. Our dark inner section is 90cm wide and 70cm tall, and each stripe is 20cm wide — making our rainbow 210cm wide and 130cm tall. Scale it up or down by changing the width of each arc.
The rainbow incorporates vertical lines that curve upwards to form the arcs. Using a ruler and pencil, draw a horizontal line on the wall that marks the width of your rainbow and where each stripe will begin to curve. We drew ours 25cm from the floor. If your bed is taller, draw it further up the wall or your pillows may obscure the inner section of the rainbow.
Mark the centre of the line (the middle of the rainbow) with a tack. Attach a long piece of string to the tack, then measure and cut it so a pencil tied to the end will touch each end of the line when you hold the string taut and draw a semicircle to form the rainbow’s outer arc (our string was 105cm long).
Shorten the string by 20cm to draw the next arc; repeat for the inner two arcs. Draw vertical lines from the horizontal line to the floor to complete each stripe.
Paint two arcs at a time by overlapping pieces of painter’s tape to mask off the first and third stripes, then apply two coats of Resene paint with a mini roller. Once dry, remove the tape and repeat with the second and fourth sections.
Stylist’s tip: If you opt for an alternative palette for your rainbow, choose Resene colours with an overarching theme in mind — for example, all pastels, all earthy shades or ombré variations of the same base hue.
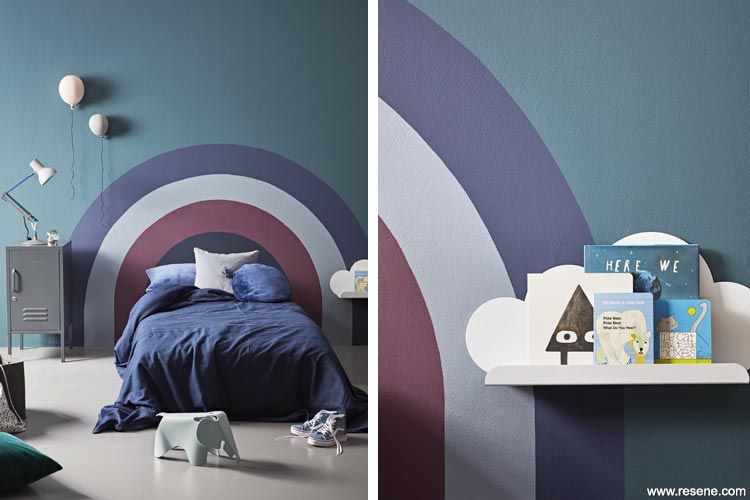 Backdrop wall: in Resene SpaceCote Flat in Resene Fast Forward; rainbow in Resene SpaceCote Flat in Resene King Tide, Resene Excalibur, Resene RSVP and Resene Indian Ink; floor in Resene Walk-On in Resene Quarter Baltic Sea.
Accessories: Left, (from front left) Emerald Velvet cushion, shutthefrontdoor.co.nz. Meadow drawstring wash bag, Felt storage basket, cittadesign.com. Shorty locker by Mustard, shutthefrontdoor.co.nz. Type 75 Mini lamp by Paul Smith for Anglepoise, cittadesign.com. Rainbow Glitter globe, ceramic balloon decorations, littlewhimsy.co.nz. Navy Velvet pillowcase, Pom Pom cushion, and Penny Round cushion, by Castle, smallacorns.co.nz. Blue Denim duvet cover, single, threaddesign.co.nz. Eames Elephant object by Vitra, cittadesign.com. SK8 hi-top shoes by Vans, greyandwild.com. Hideout Cloud shelf, hideseek.co.nz. Books stylist’s own.


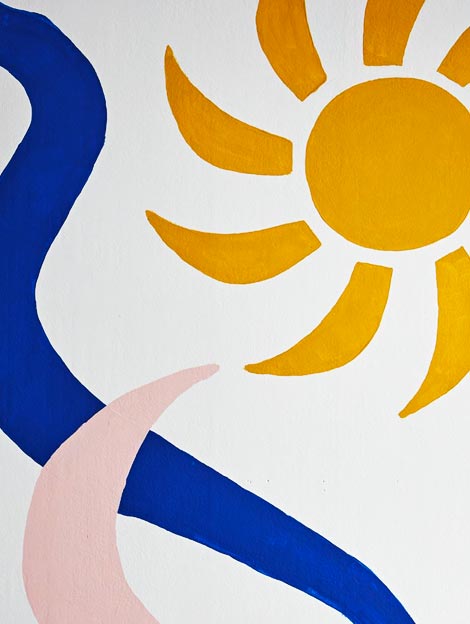
Excite an enquiring mind with a playroom mural that features colourful hieroglyphic-like shapes.
Create a blank canvas for your design by painting the wall with two to three coats of a pale neutral hue. We chose Resene Half Spanish White.
Devise your colourful doodles by experimenting on paper with Resene testpots in bright colours. Once you’ve settled on your shapes, draw them to scale on large pieces of paper (or several pieces of paper taped together).
Cut out the shapes and arrange them on the floor. Take a photo of your ideal positioning, then use masking tape or blu tack to hang the shapes in position on the wall one by one.
Use a pencil to trace around the edges of each shape, then remove the paper. For an organic, freehand effect, paint over the pencil lines using a fine paintbrush and Resene testpots, then use a larger brush to carefully fill in each shape with two coats of paint.
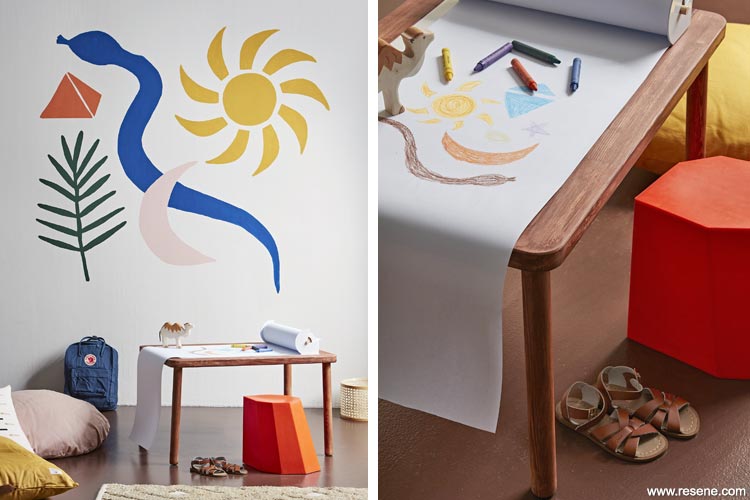 Backdrop Wall: in Resene SpaceCote Flat in Resene Half Spanish White; pyramid in Resene testpot paint in Resene Jailbreak; palm leaf in Resene testpot paint in Resene Permanent Green; moon in Resene testpot paint in Resene Shilo; snake in Resene testpot paint in Resene Submerge; sun in Resene testpot paint in Resene Cleopatra; floor in Resene Walk-On in Resene Rebel.
Accessories: (From front left) Kalahari beanbag, dappermrbear.com. Match linen cushion cover, cittadesign.com. Sahara beanbag, Backpack by Kånken, dappermrbear.com. Flisat children’s table by Ikea, akia.co.nz, stained with Resene Colorwood Cedar, Wooden camel, littlewhimsy.co.nz. Hideout roller, hideseek.co.nz. Sandals by Saltwater, greyandwild.com. Arnoldino stool by Martino Gamper, paperplanestore.com. Cairo rug by Armadillo & Co, from theivyhouse.co.nz. Wickerwork plant bucket, shutthefrontdoor.co.nz. Crayons stylist’s own.


Styling: Juliette Wanty. Photography: Wendy Fenwick. 2019
▸ Download a PDF of this article
Projects from Homestyle magazine
View more project ideas from Homestyle magazine in the Resene weekend DIY projects section.
![]() Get inspired ! Subscribe
Get inspired ! Subscribe ![]() Get saving ! Apply for a DIY card
Get saving ! Apply for a DIY card
![]()
Can't find what you're looking for? Ask us!
Company profile | Terms | Privacy policy | Quality and environmental policy | Health and safety policy
Colours shown on this website are a representation only. Please refer to the actual paint or product sample. Resene colour charts, testpots and samples are available for ordering online. See measurements/conversions for more details on how electronic colour values are achieved.
What's new | Specifiers | Painters | DIYers | Artists | Kids | Sitemap | Home | TOP ⇧