Mark Rayner creates a stylish metallic-effect window box.
You will need: 22mm treated ply cut into:
Also required: A hammer, 40mm jolthead galvanised nails, drill with large drill bit, paintbrushes, small paint tray and roller, sandpaper, saw, pencil and exterior PVA glue. Resene Quick Dry undercoat, Resene Lumbersider tinted to Resene Astronaut, Resene Enamacryl Metallic tinted to Resene Time Warp and Resene Concrete Clear.
To get the look: Mark planted up the window box with pink 'pot mums' and painted the window frame with Resene Space Cadet and Resene English Sage, and the wall with Resene Oyster Bay.
Top tip: To prevent painted ply coming in direct contact with potting mix, place pots in the window box or line with heavy plastic, making sure you cut drainage holes.
![]()
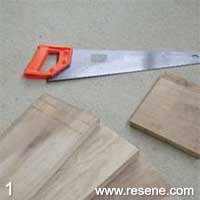
Step 1
Use the saw to cut the plywood to the dimensions listed above.

Step 2
Fix the side panels to the front and back panels using the PVA glue and 40mm nails.
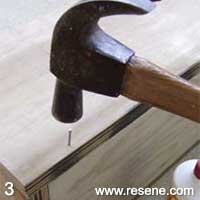
Step 3
Fix the base into position, as shown, with PVA glue and 40mm nails. Allow glue to dry.
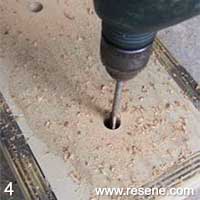
Step 4
Drill three large drainage holes in the base, as shown. Smooth off any rough edges with sandpaper.
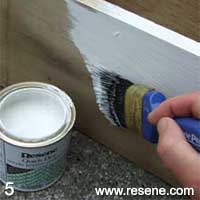
Step 5
Apply one coat of Resene Quick Dry primer undercoat to all surfaces of the window box and leave to dry for one hour.

Step 6
Apply two coats of Resene Astronaut to all surfaces of the window box, leaving two hours for each coat to dry.

Step 7
With the small roller and tray apply two coats of Resene Time Warp to the outside and top edges of the window box. Allow two hours for each coat to dry.
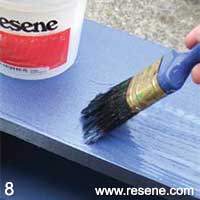
Step 8
Apply one coat of Resene Concrete Clear to all surfaces of the window box and allow two hours to dry.
![]() Get inspired ! Subscribe
Get inspired ! Subscribe ![]() Get saving ! Apply for a DIY card
Get saving ! Apply for a DIY card
![]()
Can't find what you're looking for? Ask us!
Company profile | Terms | Privacy policy | Quality and environmental policy | Health and safety policy
Colours shown on this website are a representation only. Please refer to the actual paint or product sample. Resene colour charts, testpots and samples are available for ordering online. See measurements/conversions for more details on how electronic colour values are achieved.
What's new | Specifiers | Painters | DIYers | Artists | Kids | Sitemap | Home | TOP ⇧


