Resene colours can be quickly and easily added to your SketchUp project using Resene SketchUp colour files. Once loaded the Resene colours can be applied to any wall, floor, beam or object etc - an ideal way to show your clients how selected Resene colours will affect the look of their project. The colour files are both Mac and PC compatible.
SketchUp Pro
Google SketchUp Pro is 3D modeling software for professionals allowing anyone to model in 3D quickly and accurately. Using 3D models, designers can make more informed decisions, communicate project details, and share ideas with colleagues and customers to reach a common goal. Contact Professional CAD Systems Ltd to find out more about SketchUp Pro.
Resene colours are available as a free download for Google SketchUp and can be installed directly into the Material Browser. Download Resene colour files free from this page.
Instructions for using Resene Colour range files for SketchUp:
Adding Resene colours to your SketchUp files is an easy process:
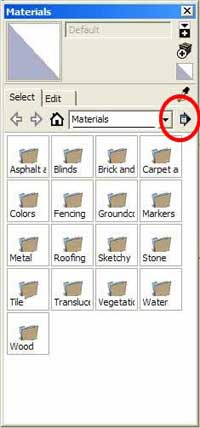
1. Open the SketchUp Materials browser. This is found under Window > Materials
2. Press the arrow button and select 'load/create a new collection'.

3. From there browse to where you have downloaded the Resene SketchUp colour ranges.
4. Select which range’s folder you would like to add and click open.
5. This will open the selected range and add it to the materials favourites menu.
From here you can apply the Resene colours to your SketchUp model. To load more Resene ranges simply download them then follow steps 1 to 5 again.
For more help with SketchUp please refer to Google's SketchUp online help.
PC: To download the file you wish to use, please right click on the file name, choose "Save link as", choose a destination folder, and click "OK".
Mac: To download the file you wish to use, please hold down "Control" and click on the file name, choose "Save link as", choose a destination folder, select "All files" in the 'Save as' field of the dialogue box and click "Save".
Resene TCS - BS2660 range.zip
Resene TCS - BS5252 range (2008).zip
Resene TCS - BS5252 range (pre 2008).zip
Resene TCS - Colorwood interior wood stains range (2011).zip
Resene TCS - Decks Driveways range (2014).zip
Resene TCS - Decks Driveways range (2011).zip
Resene TCS - Decks Driveways range (2009).zip
Resene TCS - Decks Paths Driveways Recreational Areas (2008).zip
Resene TCS - Decks Paths Driveways Recreational Areas (pre 2007).zip
Resene TCS - FilmPro professional set paint.zip
Resene TCS - Heritage range (2015).zip
Resene TCS - Heritage range (2008).zip
Resene TCS - Heritage range (pre 2008).zip
Resene TCS - Hi-Glo range (2008).zip
Resene TCS - Hi-Glo range (pre 2004).zip
Resene TCS - Karen Walker range 5.zip
Resene TCS - Karen Walker range 4.zip
Resene
TCS - Karen Walker range 3.zip
Resene
TCS - Karen Walker range 2.zip
Resene
TCS - Karen Walker range 1.zip
Resene
TCS - KidzColour range (2015).zip
Resene
TCS - KidzColour range (2012).zip
Resene
TCS - KidzColour range (2008).zip
Resene
TCS - KidzColour range (pre 2008).zip
Resene
TCS - Lumbersider range (2005).zip
Resene
TCS - Lumbersider range (pre 2005).zip
Resene TCS - Metallics and special effects range (2014).zip
Resene TCS - Metallics & Special Effects range (pre 2005).zip
Resene
TCS - Multi-Finish range (2016).zip
Resene
TCS - Multi-Finish range (2008).zip
Resene TCS - Multi-Finish range (pre 2006).zip
Resene TCS - Roof systems chart (2014).zip
Resene TCS - Roof systems chart (2010).zip
Resene TCS - Roof systems chart (2011).zip
Resene TCS - The Range fashion colours 16.zip
Resene TCS - The Range fashion colours 14.zip
Resene TCS - The Range 2011-12.zip
Resene TCS - The Range 2010.zip
Resene
TCS - The Range 2009.zip
Resene
TCS - The Range 2008.zip
Resene
TCS - The Range 2007.zip
Resene
TCS - The Range 2006.zip
Resene
TCS - The Range 2005.zip
Resene
TCS - The Range 2004.zip
Resene
TCS - The Range 2003.zip
Resene
TCS - The Range 2002.zip
Resene
TCS - The Range 2001.zip
Resene
TCS - The Range 2000.zip
Resene TCS - The Range whites & neutrals (2014).zip
Resene TCS - The Range whites & neutrals (2012).zip
Resene TCS - The Range whites & neutrals (2010).zip
Resene TCS - The Range Whites & Neutrals (2009).zip
Resene
TCS - The Range Whites & Neutrals (2005).zip
Resene
TCS - The Range Whites & Neutrals (pre 2005).zip
Resene
TCS - WB Colorwood interior wood stains range.zip
Resene TCS - Whites and Neutrals (2012).zip
Resene TCS - Whites and Neutrals (2010).zip
Resene TCS - Whites and Neutrals (2009).zip
Resene
TCS - Whites and Neutrals (2008).zip
Resene
TCS - Whites and Neutrals (2006).zip)
Resene
TCS - Whites and Neutrals (pre 2006).zip)
Resene TCS - Woodsman (2015).zip
Resene TCS - Woodsman (2008).zip
Resene
TCS - Woodsman (pre 2008).zip
Resene
TCS - special palette - Arrowtown.zip
Resene
TCS - special palette - Diwali.zip
Resene TCS - special palette - Gisborne.zip
Resene
TCS - special palette - Great Barrier/Hauraki Gulf.zip
Resene
TCS - special palette - Hanmer Springs.zip
Resene TCS - special palette - Rotorua.zip
Resene TCS - special palette - Style Pasifika.zip
Resene TCS - special palette - Waikato Coastal.zip